Flint in 60 seconds
An introduction to the editor interface and features.

Editor Layout
The editor has three main areas: the canvas (where you build), the sidebar (for navigation), and the AI chat (where AI builds).
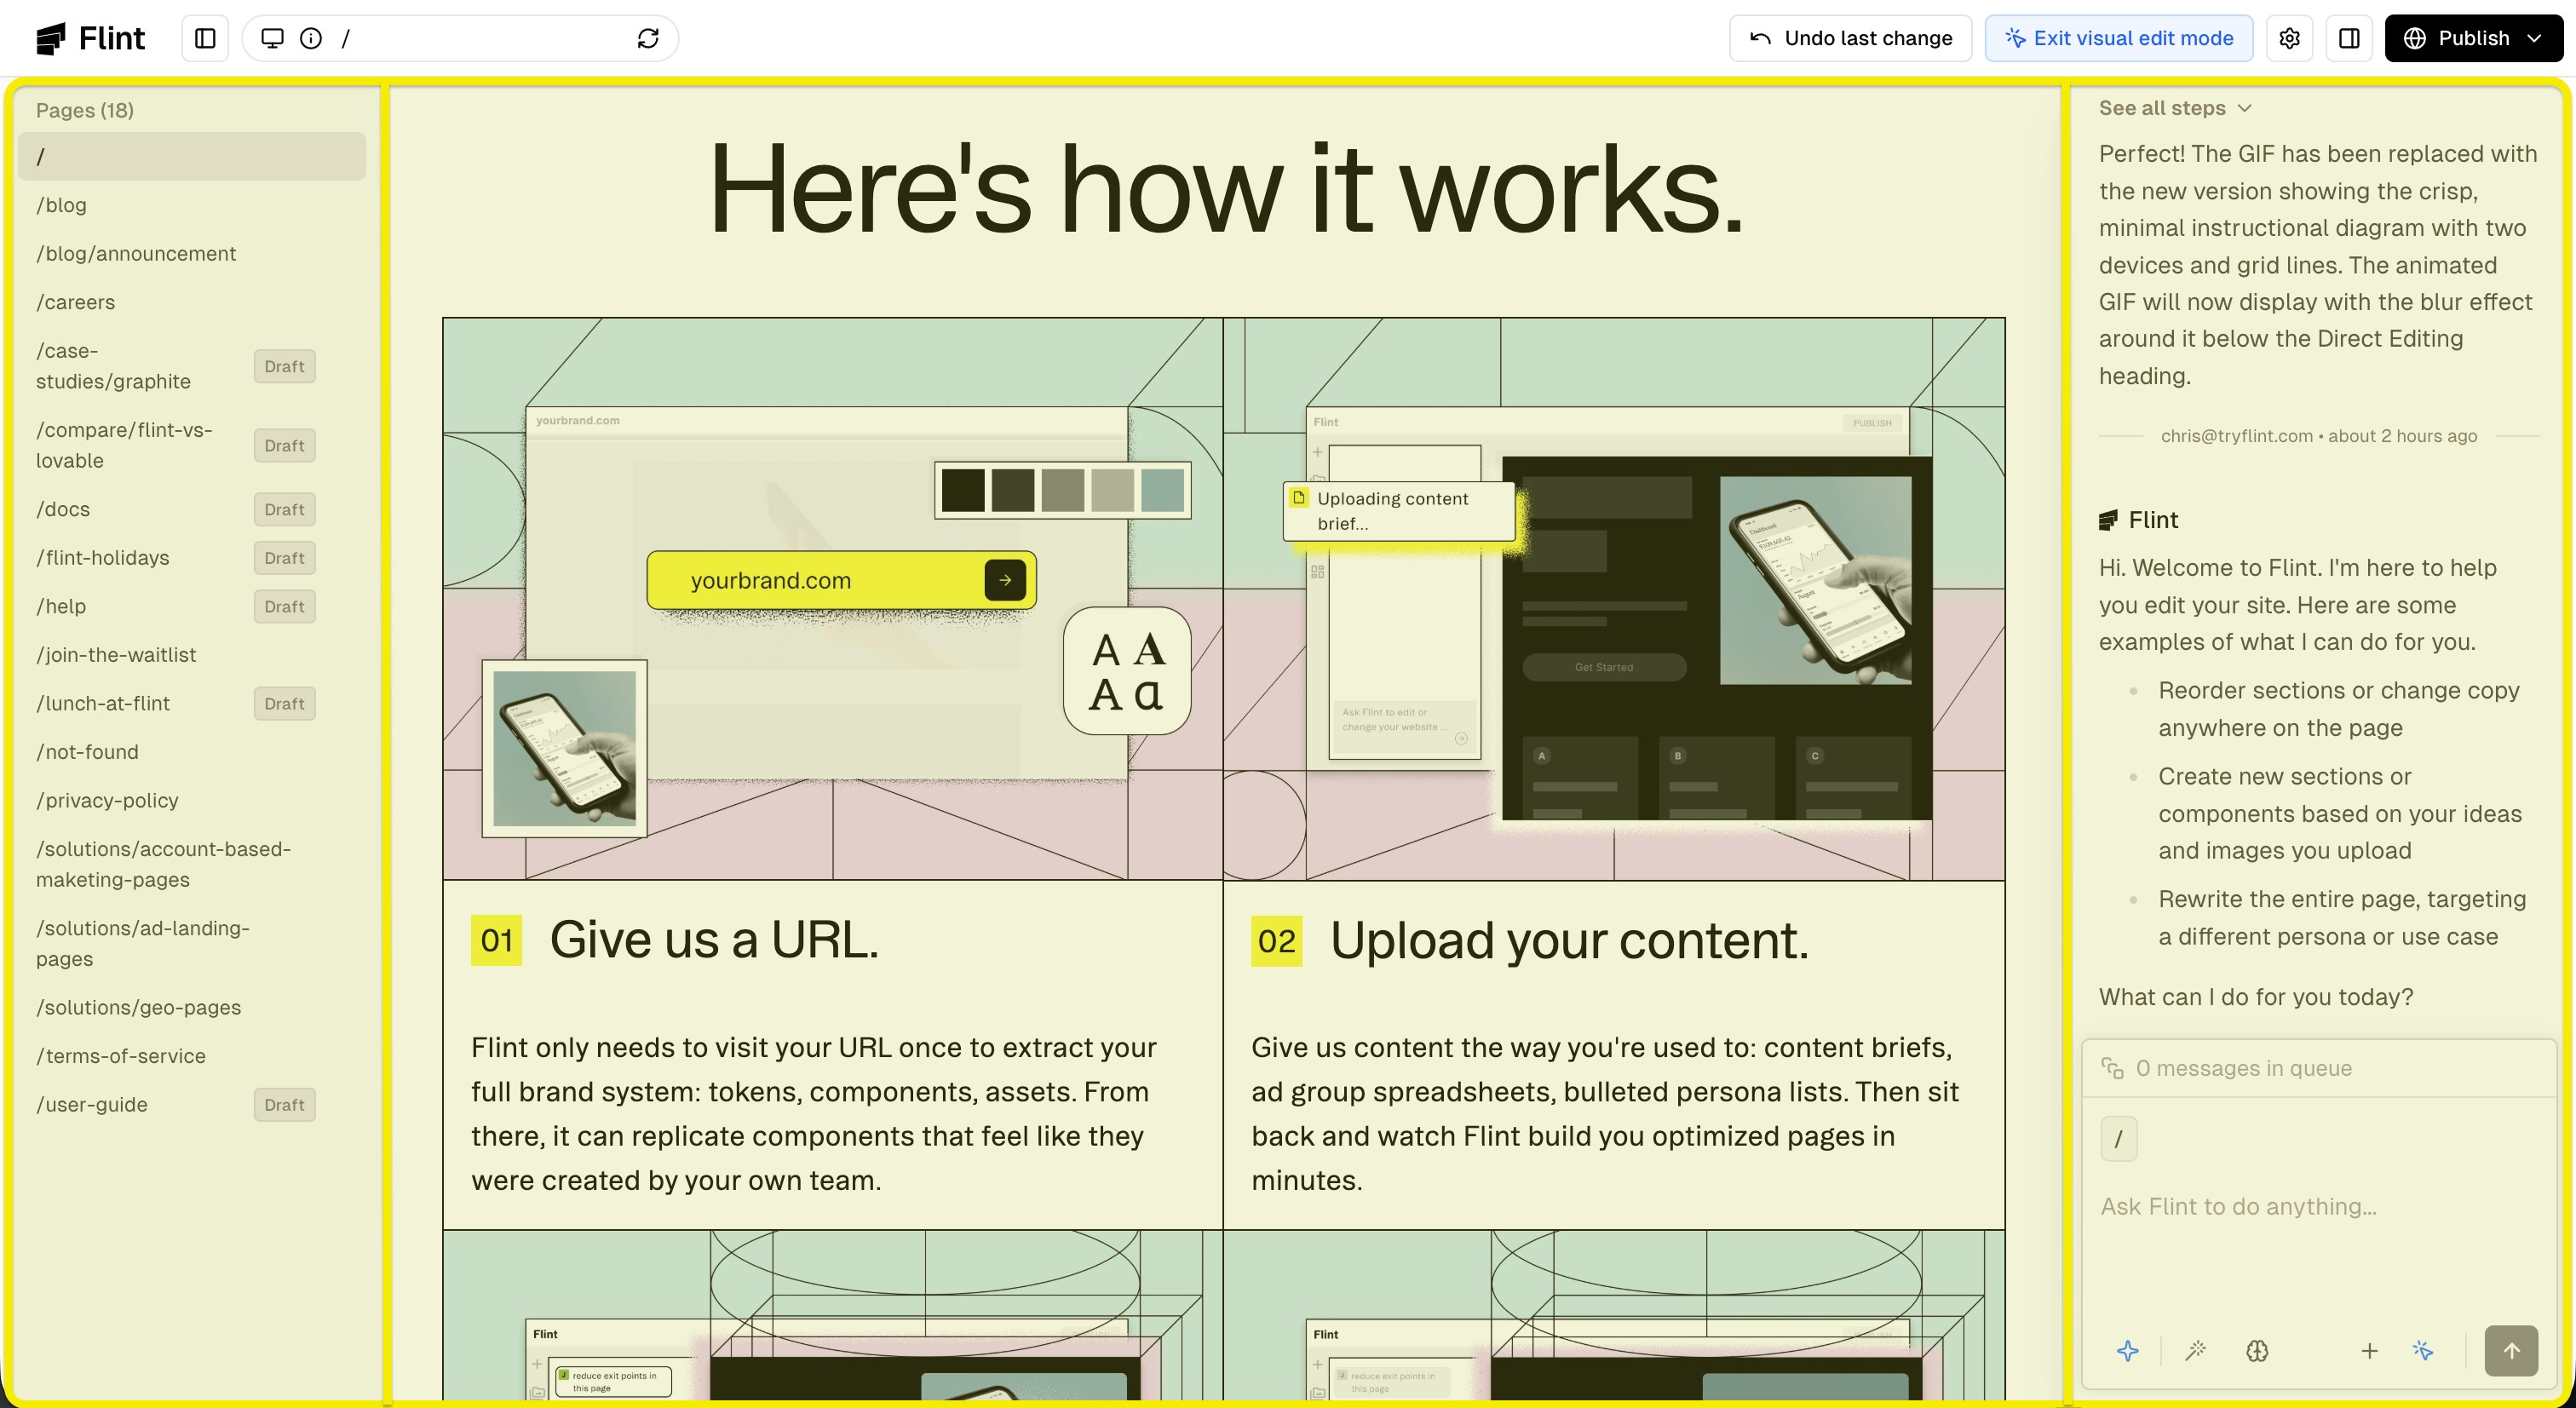
Direct Editing
Click any text or image to edit it directly on the canvas. This makes quick updates incredibly fast and intuitive.
AI-Powered Changes
For more complex edits, describe what you want and Flint will handle it.
Image Generation
Have the Flint agent access your existing and newly generated assets from the asset library in the AI chat.
Publishing
When you're ready, click the publish button to push your site live at your configured domain.
Hosting in 60 seconds
Learn how to host your Flint site.
Coming soon...
Inviting Members
Learn how to invite team members to your Flint organization.
You can invite team members to your Flint organization through the organization settings.
How to Access Organization Settings
Direct link: app.tryflint.com/app/organization-settings
Or from the home page, click Settings.
To Invite a New Member
1. Under Organization Settings, click Invite Member 2. Enter your team member's email address and submit 3. They'll receive an invitation email (have them check spam if it doesn't appear within a few minutes)
Troubleshooting
Fix common publishing issues.
ABM Workflow
Bulk generate personalized Account Based Marketing pages for your key accounts starting with a CSV.
The ABM Workflow Play walks you through bulk generating personalized ABM pages for your key accounts. Access it from the dashboard or from Prompt Templates within chat. Flint will generate a template if you don't have one, then create personalized copies from your CSV.
Images
Edit, generate, and manage images in your Flint pages.
Videos
Add and manage videos in your Flint pages.
Third-Party Logos
How Flint fetches real company logos for partners, integrations, and customers.
External Content
Import designs, images, and content from external sources.
Design System Extraction
How Flint extracts your brand's design system and keeps pages on-brand.
Switching Pages
Learn how to navigate between pages in your project.
Find the Pages button on the top left section of the editor. This button will open the page selector showing all pages available in the current project. Click on any item to choose the page you want to edit.
Sharing and Previewing
Learn how to share and preview your pages.
Find the Share button on the top right section of the editor. Here you can:
• Open the preview page in a new tab • Copy the link to your clipboard • Share the link with others or review Flint's work
Undo and Redo
Easily reverse or restore changes with undo and redo.
Made a mistake or prefer a different design? Use the undo and redo buttons to reverse or restore recent changes.
How to Undo
Click the undo button in the editor toolbar or press Cmd/Ctrl + Z to reverse your last change. You can undo multiple times to step back through your edit history.
How to Redo
Click the redo button or press Cmd/Ctrl + Shift + Z to restore a change you just undid. This is helpful if you undo too far and want to bring back a recent edit.
Tips
Undo and redo work across all types of changes - content edits, style adjustments, component additions, and deletions. Your full edit history is preserved during your editing session.
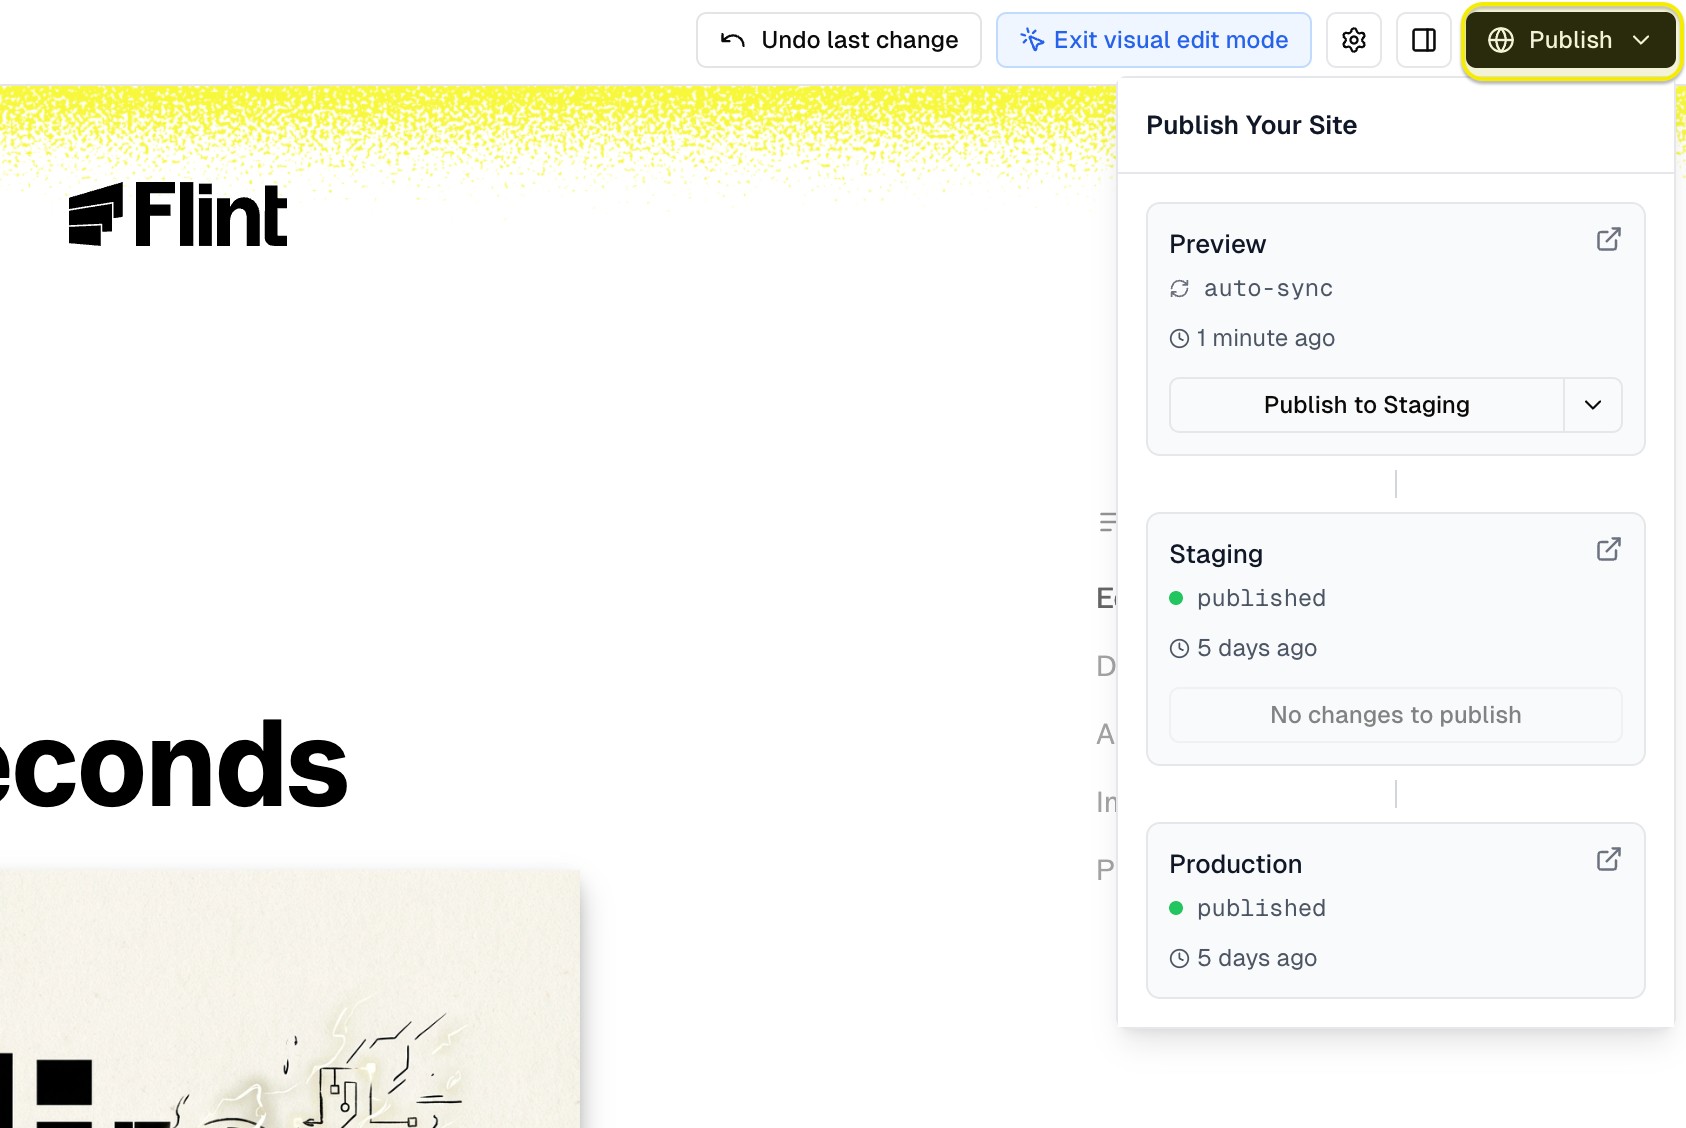
Publishing Your Site
Learn how to publish your site and preview changes before going live.
Find the Publish button in the top right corner of the editor. Clicking it opens a panel where you can publish your site to make it live.
Previewing Your Changes
Before publishing, you can preview your current page using the Share button. This generates a live preview link that shows your latest changes.
AI Change Summary
Flint's AI automatically generates a summary of all changes you've made since your last publish.
Publishing
When you're ready, click Publish to make your site live.
Subdomains
Configure subdomains for your Flint pages.
Technical Setup
Learn about Flint's routing and deployment model.
Analytics & Tag Manager
Set up GA4 and GTM for tracking and conversions.
Custom Code
Add custom code to your pages' head or body.
For analytics settings that require custom code in the <head> or <body> of your pages:
1. Click the Settings button in the top left section of the editor 2. Click the Site Settings tab 3. Click the Custom Code accordion 4. Add your code to the Head Scripts or Body Scripts fields as needed
Forms
Insert lead capture forms into your pages.
To insert a lead capturing form in your Flint pages:
• Paste the embed code or URL in the chat and ask the agent to add the form to any specific section
Styling Considerations
• Embed code: Form styling is pre-configured in the HTML; Flint has limited control over it • URL only: Flint can fully customize the form layout to match your brand
Query Parameters
Use URL parameters for tracking and personalization.
A/B Testing
Run experiments with Statsig, LaunchDarkly, or Eppo.
FAQ
Browse all FAQs about editing, design, technical features, and more.
Agent Tasks API
Create and monitor background agent tasks that modify your Flint sites. Enterprise only.
The Agent Tasks API allows you to programmatically create and monitor background agent tasks that modify your Flint sites.
This API is available exclusively on Enterprise plans. Contact sales to enable API access for your organization.
Base URL
https://app.tryflint.com/api/v1
Authentication
All requests require authentication via API key. Include your API key in the Authorization header:
Authorization: Bearer ak_your_api_key_here
API keys can be created in your Flint dashboard. Keys are scoped to your organization and require at least member role permissions.
Rate Limiting
These endpoints are rate limited. If you exceed the limit, you'll receive a 429 Too Many Requests response.
Create a Task
POST /agent/tasks
Start a new background agent task to modify a site.
Request Body: • siteId (string, required) - UUID of the site to modify • prompt (string, required) - Instructions for the agent to follow
Example Request: curl -X POST https://app.tryflint.com/api/v1/agent/tasks \ -H "Authorization: Bearer ak_your_api_key_here" \ -H "Content-Type: application/json" \ -d '{ "siteId": "550e8400-e29b-41d4-a716-446655440000", "prompt": "Add a new About page with a team section" }'
Success Response (200): { "taskId": "bg-550e8400-e29b-41d4-a716-446655440000-a1b2c3d4" }
Error Responses: • 400 - Site is missing repository information • 404 - Site not found • 500 - Failed to start task
Get Task Status
GET /agent/tasks/{taskId}
Retrieve the current status and results of a task.
Path Parameters: • taskId (string) - The task ID returned from creation
Example Request: curl https://app.tryflint.com/api/v1/agent/tasks/bg-550e8400-a1b2c3d4 \ -H "Authorization: Bearer ak_your_api_key_here"
In Progress Response: { "taskId": "bg-550e8400-a1b2c3d4", "status": "running", "phase": "executing" }
Completed Response: { "taskId": "bg-550e8400-a1b2c3d4", "status": "completed", "output": { "pagesCreated": [...], "pagesModified": [...], "pagesDeleted": [...] } }
Failed Response: { "taskId": "bg-550e8400-a1b2c3d4", "status": "failed", "errorMessage": "Failed to generate page content" }
Output Fields
When a task completes successfully, the output object contains: • pagesCreated (array) - Pages that were newly created • pagesModified (array) - Existing pages that were updated • pagesDeleted (array) - Pages that were removed
Each page object contains: • slug (string) - The page path (e.g., /about) • previewUrl (string/null) - URL to preview the page on the deployment • editUrl (string/null) - URL to edit the page in the Flint editor
Polling for Completion
Tasks run asynchronously. Poll the GET endpoint to check for completion. We recommend polling every 5 seconds with a maximum of 60 attempts (5 minutes timeout).
Example polling implementation: async function waitForTask(taskId, apiKey) { const maxAttempts = 60; const delayMs = 5000; for (let i = 0; i < maxAttempts; i++) { const response = await fetch( `https://app.tryflint.com/api/v1/agent/tasks/${taskId}`, { headers: { Authorization: `Bearer ${apiKey}` } } ); const data = await response.json(); if (data.status === "completed" || data.status === "failed") { return data; } await new Promise((resolve) => setTimeout(resolve, delayMs)); } throw new Error("Task timed out"); }
Claude MCP Integration
Connect Claude Desktop to Flint for AI-powered site editing via MCP.
Claude Code MCP Integration
Connect Claude Code to Flint for AI-powered site editing via MCP.
Flint Plugin for Claude Code
Build and manage Flint websites through natural conversation in Claude Code.
Terms of Service
Flint subscription terms and conditions.
Privacy Policy
How we collect, use, and protect your information.
Security
Our security practices and compliance certifications.
Service Level Agreements
Uptime, performance, and support commitments.
Documentation
Everything you need to know about building with Flint
Getting Started
Learn the basics of using Flint to build beautiful marketing pages
Plays
Guided workflows for launching programmatic pages at scale
Working with Assets
Add and manage images, videos, logos, and external content
Brand Import and Sync
Import your brand's design system and keep pages on-brand
Navigating the Editor
Learn how to navigate and use the Flint editor
Publishing
Publish your site and preview changes
Site Configuration
Configure analytics, tracking, custom code, and lead capture
FAQ
Frequently asked questions about Flint
API Reference
Programmatically interact with Flint using our REST APIs
Legal
Legal documentation and service agreements